10.1. Inflate Image
This command takes an image and converts it into a 3D model.
1) Select Inflate Image from the Model menu.
2) Click Image... and pick a BMP image.
3) Click OK and you are done.
4) You can cancel during the "Prepare Height..." phase - It will still make a mesh, but will skip the rest of the smoothing steps.
The final mesh is made at the origin, with size determined by the two scale values [If Scale(X,Y) is the same as Scale(Z) an image circle should become a 3D sphere].
It is usually best to use a higher resolution image than you want the final mesh to be, Quad Size (pixels) is the width of an output quad represented as a number of incoming image pixels. (Using a Quad size of 1 gives very large (slow) meshes and also bugs in Curvy).
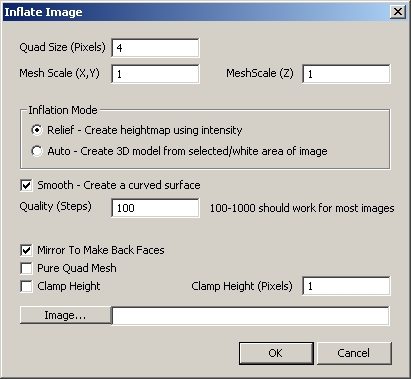
Image Inflate Settings
Inflation Mode
Relief mode creates a heightmap from the image brightness.
Use a greyscale image with white where you want a higher surface.
Auto mode cuts out the white area of the image and estimates a rounded 3D surface to make a 3D model - this mode can handle very complex input images.
The best images to use are solid black and white pictures (not greyscale), 128-256 pixels wide with patches of solid white where you want your object to appear.
mooth
Uncheck to get a straight line inflation, a circle becomes a cone, a rectangle becomes tent like. This can be useful along with Clamp Height to make spaceship bumpmaps.
Quality (Steps)
Used to control smoothness of the Auto surface.
Mirror
Mirror to make back faces - Tick to make a full 3D surface, leave unticked to make a simple heightmap.
Pure Quad Mesh
Pure Quad Mesh puts quads at the edge of the geometry instead of triangles - (better for subdivision). Triangles on the edge give cleaner models in Curvy.
Clamp Height
If you tick Clamp Height any point more than Clamp Height (Pixels) away from an edge is flattened out - giving a beveled effect.
10.2. Add Trim Lines Along Edge
On a mesh with open edges (for example a loft, or a model cut in half to create a thin shell) you can use this command to add line objects that follow the edge, creating a border or trim effect.
This is similar to "Extract Edge Boundary" but it is often useful to go straight to the finished Line objects rather than having to convert Sketch curves into Lines.
10.3. Send View to Dogwaffle Brush
Saves the perspective view to the Dogwaffle painting program as a Brush (Requires Dogwaffle running alongside Curvy).
10.4. Send View to Dogwaffle Buffer
Saves the perspective view to the Dogwaffle painting program as a Buffer.
10.5. Send Active Texture to Dogwaffle Buffer
Saves the active texture to the Dogwaffle painting program.
10.6. Fetch Dogwaffle Buffer to Active Texture
Retrieves current Dogwaffle Buffer to the active texture.
N.B. Requires same image dimensions.
10.7. Sculptie Mode
Enhanced exporting enabled for making Sculpties (Image based 3D models for 2nd Life)
10.8. Uniform Sized Sculpties
Resizes the sculptie output to make uniformly sized sculpties.
10.9. Wine Compatibility Mode
If you are using Wine under Linux or Mac this mode can help fix compatibility issues.
10.10. Play Script...
Playback a recorded script.
Scripts are created using the "Activity Menu" called "File" which is visible in the bottom right of a viewport when no objects are selected.
You can start and stop recording and save scripts.
N.B. This is an unsupported and undocumented feature!