This part of the guide will get you started with Curvy, you can learn in more detail in the
sections.
1. Views and Panels
When you start Curvy the application window will appear like the image below.
The interface consists of 3 areas:
1) Views These show your 3D models from different angles.
2) Panels Tools, controls, and object properties are found here.
3) Menus Commands and options are split into categories.
This guide will refer to views and panels by name. The name of each view appears in orange in the top left. Panel names are at the top of each panel.
Around the edges of each view there are
view controls. Don't worry about these for the time being.
As you use Curvy you will notice the mouse cursor changes shape. Move the cursor over a view and you will see a
tool cursor ( this means the tool is ready for use ), move the cursor over a panel or view control and it will change into a plain arrow.
2. The Toolbox
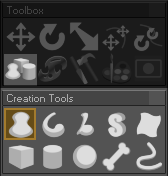
Find the Tools Panel at the top left of the window. Tools are the main way to interact with the 3D models you create in Curvy. Clicking on a tool button will choose that tool or toolset and reveal related tools and commands in the panels below.
The tool you choose will become pressed down, and the tool cursor will change into your selected tool.
Some tools need an object to be selected before they can be used. If you do not have an object selected the tool will appear dark and the tool defaults to the Select Tool until you have chosen an object.
3. Draw your First Object
To draw your first object in Curvy you will need the
Create Lathe Tool
Select this tool by clicking "Creation Tools" in the Toolbox then on it's button in the Creation Tools Panel below.
Your mouse cursor should now appear like this

when you move it over a view.
In the Perspective View (in the centre of the window) draw a single continuous line with the Create Lathe Tool by dragging the Left Mouse Button.
You will see the line being drawn in purple. The line is drawn top to bottom in the same shape as you can see in this screenshot.
When you release the Left Mouse Button Curvy will create a new Lathe Object.
The line you drew has turned orange. This is the colour to show a selected object. Now you have a selected object more tools become available to you.
4. Select your Object
Deselect your object by clicking with the right mouse button (RMB) in an empty part of a view - or by pressing SPACE.
Right mouse button is a quick shortcut to choosing the Select Tool from the Toolbox.
The curves disappear when the object is not selected.
Now, hold down the RMB in a view and drag it over and off your object. Notice how all the curves appear in light blue, and when you move over a curve it turns orange.
If you let go of the RMB while an object is orange that object will be selected.
With an object selected, using the RMB to select will pick an individual curve out of that object to edit.
5. View your First Object
This section explains how to change the views using the Pan, Orbit and Zoom tools.
These tools are found in the Toolbar at the top-middle of the screen.
The easiest way to learn these tools is to use them! Pick a view tool and drag on one of the views.
NB: If you Orbit in any view other than Perspective the view will snap back to facing in it's original direction. This is to make sure the Front View always faces the front of your model, the Left View always faces the left and so on.
Each view has three buttons in the lower left corner.

Recenter - One LMB click centers the view on the selected object if one is available, or the centre of the scene if nothing is selected.

Orbit - Dragging with the LMB orbits the view.

Zoom - Drag with the LMB to zoom.
If you have a three button mouse you can access all the view controls very quickly.
Pan - Drag with Middle Mouse Button
Orbit - Drag with Left Mouse Button while holding down the
Alt key
Zoom - Roll the mouse wheel.
6. Sculpt your Object
Select the Sculpting Tool
Add and sculpt with the Left Mouse Button on your object.
As you draw the surface is pulled towards your mouse.
Try drawing with the Right Mouse Button to push the surface in.
7. Paint on your Object
Now select the Paint Brush Tool
You can paint by dragging with the LMB over your model in the 3D view.
You can choose different colours and change the paint brush size/opacity and shape using the tools in the Colour Panel and the Paint Brush Panel.
8. Save your Model
Save your model at any time by using the menu "File:Save..." and entering a name.


 when you move it over a view.
In the Perspective View (in the centre of the window) draw a single continuous line with the Create Lathe Tool by dragging the Left Mouse Button.


 Recenter - One LMB click centers the view on the selected object if one is available, or the centre of the scene if nothing is selected.
 Orbit - Dragging with the LMB orbits the view.
 Zoom - Drag with the LMB to zoom.
If you have a three button mouse you can access all the view controls very quickly.
Pan - Drag with Middle Mouse Button
Orbit - Drag with Left Mouse Button while holding down the Alt key
Zoom - Roll the mouse wheel.


