5.1. Smooth S
Gently smooth out a curve.
5.2. Smooth More Ctrl+S
Strong smooth effect on a curve.
5.3. Add Curve from Clipboard
Select a curve and Copy it to the clipboard. Then you can reuse the curve in other Curvy Objects with Add Curve from Clipboard.
5.4. Replace Curve with Clipboard
You can't create a new object from a Clipboard Curve, so you need to draw any curve to create the object then select that curve and Replace it with the curve on the clipboard.
5.5. Clone
Make a clone of this curve in place. You will need to move the new curve away from the original to see them separately.
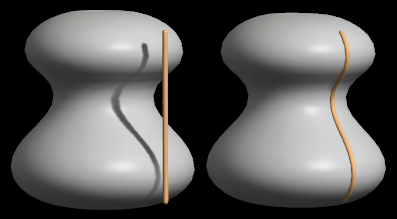
5.6. Mirror Clone
Duplicates and mirrors the new curve.
Whereas "M" symmetry creates a virtual fourth line for a lathe object, Mirror Clone can be used to create a real fourth line opposite the third, and since this avoids using symmetry the map can be different on either side of the model.
5.7. Drop to Surface
Line up the Perspective view so your selected Curve lies over some other meshes. Drop to Surface will move the selected curve onto the other objects in the direction of the Perspective View.
5.8. Align Curve to Axis
This rotates the curve a little bit to make the endpoints line up with the axis directions. This is useful for straightening a freehand drawn shape.
5.9. Curve Reverse
Swaps the start and end points of a Curve.
Sometimes useful to correct the direction of Curves in a Lathe or Loft to match the object's other curves.
5.10. Curve Offset
Adds an Offset Action to the curve. For example if you have a Slab object and want to cut out a smaller version of the outline, use Offset with "Clone" enabled.
Finalise the action with the "Bake Action" button.
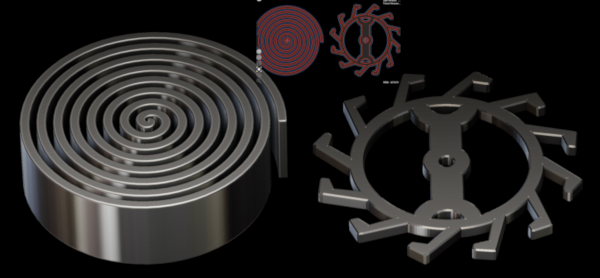
5.11. Curve Symmetry
Adds a Symmetry Action to the curve. Useful for making shapes like cogs and gears, or abstract patterns.
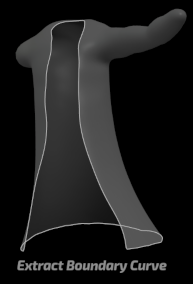
5.12. Extract Mesh Boundary
On a mesh with a hole, or a masked area of a mesh this creates new Sketch Curves than run along the edge of the holes/mask.
These can then be copied and reused to make other Curvy Primitives such as Lines and Proxy Rails.
5.13. LoadBezier
Create an object with curves (can just be a Sketch Object) then use LoadBezier to fill it with the curves from a SVG file.
If you bring in several curves you can separate them out with Copy and "Add Curve from Clipboard", or by duplicating the object and deleting the unwanted curves.
You can import text, or intricate patterns from SVG files made in software like Inkscape.
5.14. Redraw As...
Redraws an entire curve to fit a precise shape.
To make accurate geometric curves and perfect spheres and ellipses use these commands to turn rough shapes into exact curves. Redraw As... Semi-Circle is especially useful for making spheres, Redraw As... Straight-Line helps make flat planes out of loft objects.
5.15. Curve Mirror
Make a Curve symmetrical from Left to Right, or Top to Bottom compared to the grid.
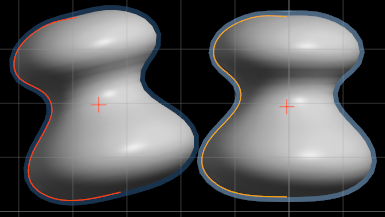
5.16. Lathe Auto Curve
Adds extra curves to a Lathe object to turn it into a 2,3 or 4 line Lathe ready for further editing.
This saves having to manually copy, mirror or rotate the extra curves into place yourself.
Adds a mirrored Curve opposite the original curve.
Adds a back and side curve, and automatically sets up Lathe Symmetry so the side is mirrored to the other side.
Adds curves to make a 4 line lathe with front, back, left and right curves.
5.17. Optimise
Reduces the point count in the current curve.
5.18. Draw Smooth Lines
By default curvy applies heavy smoothing to each drawn curve.
5.19. Draw Precise Lines
Choose this option to allow raw unsmoothed curve drawing.
5.20. Draw Bezier Path
This option will create a Bezier Path controlled by handles instead of a freehand curve when you draw.
The first line creates an initial node in the path - then you can use the Bezier Curve Tools to create and edit the rest.
5.21. Curve Optimise
Adds an Optimise Action to the curve.
Use the Distance Slider, or the Target number of points Number to simplify a curve to use fewer points.
The Sharpen tick box adds points back into the curve around sharp corners to preserve them - like a small bevel effect. Useful for making neatly cornered hard edge shapes.
Sharpen Threshold - how sharp must a corner be before it gets extra points added.
Sharpen Bevel - distance from the corner new points are added.