This panel changes slightly when different Primitives are selected. For more information see
.
Left click on the name of your object at the top of the panel to type in a new name.
Press
after clicking the name to clear the old name ready to type in a new one.
Press
to confirm the new name.
4.1. Texture Maps
Texture Map Icon
Left click on the icon to select it for painting. A little paintbrush icon shows which texture is current.
Hold the left button on the icon to choose from currently loaded images.
Right click on the icon to open an image from a file.
A
Lock icon means this texture is unchanged since the last save. As soon as you paint on a locked image, a copy is made for editing and this will be saved to a new file when you save the scene.
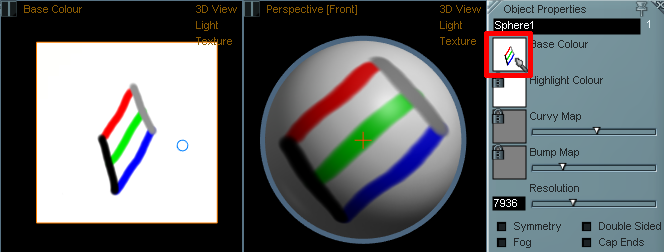
4.1.1. Base Colour
The
Base Colour or
Diffuse controls the basic colour of a model, much like painting with matte paint.
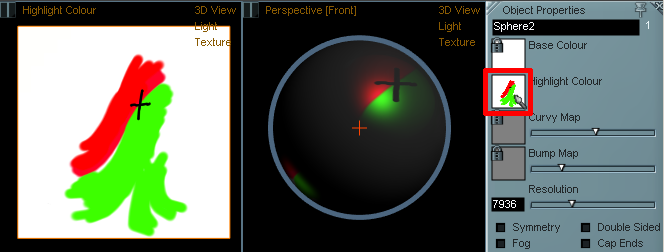
4.1.2. Highlight Colour
The
Highlight Colour or
Specular controls the shiny highlights on a model. Paint with shades of dark grey to "dirty up" the model and remove highlights, or paint with brighter colours to emulate shiny and metalic surfaces.
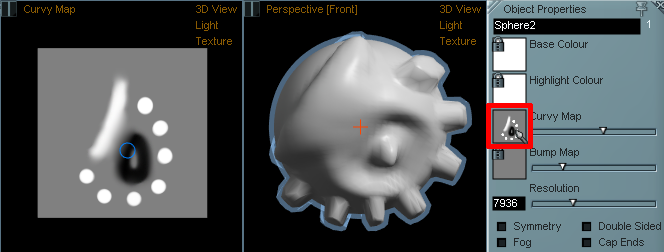
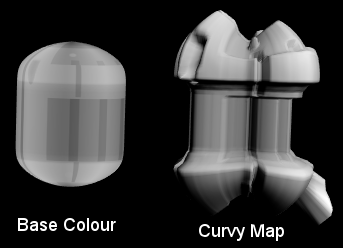
4.1.3. Curvy Map
The
Curvy Map or
Displacement Map distorts the surface of your model.
This is particularly useful in combination with loading existing images from your texture library to quickly add surface detail to a model.
Curvy Displacement Slider
The slider next to the Curvy Map sets the amount of displacement. When in the middle the displacement is zero, to the right of centre displacement is positive, and to the left displacement is negative. You can also right click the slider and enter a numeric value.
4.1.4. Bump Map
The
Bump Map is similar to the Curvy Map in that it appears to distort the surface - but in the case of the bump map the distortion does not actually move the mesh, it just creates an illusion of bumps and dents on the surface.
It is useful to add fine details to a model's surface.
Bump Intensity Slider
The slider next to the Bump Map sets the strength of the effect. You can also right click the slider and enter a numeric value.
4.2. Resolution
The number below Resolution shows the triangle count for the current object.
The Resolution slider is active with Lathe/Line/Loft primitives and lets you adjust the number of triangles in the model.
The other primitives and all mesh objects have fixed triangle counts - but you can still adjust them using the Reduce and Refine commands from the mesh menu.
4.3. Check Boxes
4.3.1. Symmetry
This is a Primitive modifier that takes effect on Lathe/Blob/Slab objects.
On Lathes it effectively mirrors the 3rd curve to the other side of curves 1 and 2 to make a symmetrical model. See
Lathe Tutorial.
On Blob and Slab it mirrors the curve drawn from left to right, and creates a symmetrical object.
N.B. Symmetry takes place in the front view over the grid centre line. To move a symmetrical object away from the centre convert to a mesh first (Press
K).
4.3.2. Soft Alpha Blending
Turn on to enable smooth blending with material and texture Alpha channels.
You can load tga files with alpha as "Base Colour" and "Base Light". By default Fog is turned off and the surface will be drawn with a sharp edge wherever alpha is less than 50%
But with Fog turned on the result is a smooth effect.
4.3.3. Glow
When Glow is turned on the model is rendered like an additive layer.
4.3.4. Double Sided
Objects in Curvy are rendered as a thin surface layer. For solid objects Curvy only needs to draw the outer side of this layer.
However for sheet-like objects (eg: A Loft without depth) Curvy needs to draw both sides of the surface.
This check box lets you toggle drawing of the "inside" side of the surface.
This can also be helpful when using Fog and Glow as you will often want to see through the surface to the inside.
N.B. To swap the inside/outside surfaces over you can use "Mesh/Reverse Surface".
4.3.5. Cap Ends
For
Lathes - if the curves do not meet at either end of a Lathe you can let Curvy fill in with an End Cap, or leave the object open.
4.3.6. Rounded
For
Lathes and
Lines - where a Lathe's curves do not meet at a point, and for all Line objects this check box determines the style of the ends of the object.
This has a slightly different effect on Line objects where the end becomes fully rounded into a hemi-sphere, whereas the Lathe gets a smooth looking, flat cap.
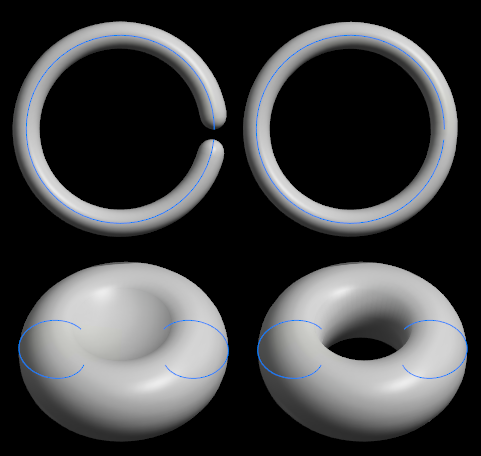
4.3.7. Closed Loop
Joins the two ends of a Line object, or the top and bottom of a Lathe object. Useful for making rings, loops and donut shapes.
4.3.8. Quad Cap
A different style for Sphere and Cylinder objects that uses a quad square on top instead of the normal triangle poles.
4.3.9. Skinned
The object will deform with it's controlling Bones skeleton.
4.3.10. Flat Shaded
Gives the object a facetted look and sharpens every edge.